

NOTE: We’re gonna tell you a little about the app and give you some pointers and tips before we get to the places to visit. You can scroll down past this till you get to Machu Pichu and start there if you’d like…
Wander is an app that we got right away, but really didn’t understand it. In some ways, it’s basically Google Streetview. You can visit anywhere on the planet that:
- Google has mapped with Streetview
- Someone has uploaded a 360 image to Google Maps
How do I get the most from Wander?
The key to Wander is to know where to visit to see the most interesting places with the best images. The problem is that the app makes this a bit tricky. They do have a curated list they created, but even that can be hit or miss.
Here’s a few tips to make your time easier. There are 2 different ways you will get to see views in Wander.
- The Blue Lines
- These are lines where Google has Street View images. These tend to be the highest quality (not always) and also optimized so they load faster. But, especially in remote places, you may not find many, nor the best vantage points as we’ll point out in the image below.
- The Blue Dots
- These are taken by random people as well as by the Google crew, but there is no way to know which. This means that some of them are not that great and others are spectacular.
- That being said, in some locations, these are the only ways to see the area. Especially in remote locations. You will often find hikers will have trekked to places you will never find Street View and they have taken 360 images for you to see.
This image is from Sigiriya Rock in Sri Lanka. A very remote ancient fortress with amazing views and archeology. But, the Street View images are mostly of roads around it. There is no Street View on the actual location of the fortress. For that you need to rely on the Blue Dots. So, the best way we found to enjoy a site like this is to look at the dots, one at a time and Favorite the ones you really like. The next image shows you with the Blue arrow where you click to Favorite an image location. After you click the star, it will fill in with yellow to show you it is Favorited and it will be added to your Favorites dashboard that you can see by clicking the large yellow start that the yellow arrow is pointing to.
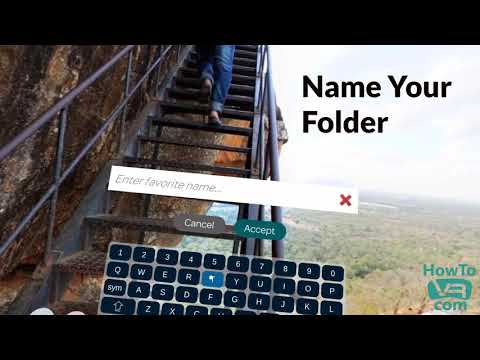
You can continue to create more favorites as you Wander through the location and then you can organize those images by putting them into a Folder in your Favorites dashboard. We made a video that shows you how to do this the hard way because we didn’t figure out the easy way until we made the video… The hard way is the make a folder after you’ve made all your favorites. Then you cut each one and paste it into your new folder. The easy way is to make the folder FIRST, then open the folder and as you visit and favorite images, they will automatically go into that folder you created and opened… The video is still pretty good, so give it a watch, we threw in another tip about moving the console out of your way using the trigger finger… Do learn from our mistakes. That’s what this site is all about, we made those mistakes so you won’t have to! Pro Tip! If you’re on a phone, turn it sideways to watch the video, and to read the content as the images are larger and easier to read. |


Jeita Grotto Cave in Lebanon & Preikenstolen, Norway

Lebanon is full of Wander locations. You can find this list in the Collections Icon on the main dashboard.
Jeita Grotto in Lebanon is a set of caverns that have been partially Google Street Viewed. See the little yellow figure on the map. That is the cavern that you can visit in Wander..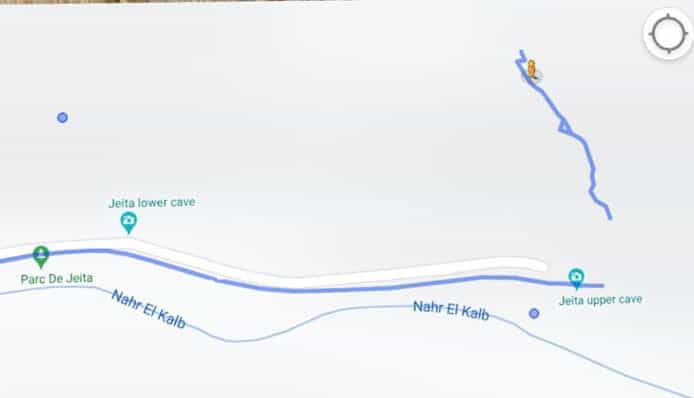
Things to note in video 1, Jeita Grotto in Lebanon:
- The area in the video is the blue line in the image above.
- The video does not do justice to how amazing this is in VR
Things to note in video 2 Preikenstolen, Norway:
- We start this one at the end of a very long hike, most of which is mapped and you can follow.
- There are many Blue Dots on this one and some good ones. We suggest you try a bunch.


