This is a FireFox Reality companion document to the one where we show you how to bring your YouTube Playlists from the desktop browser into your headset to watch in VR.
We’re going to assume you read that document and you’ve already figured out how to do this with the YouTube VR app, and you’re here because you would like to learn how to do this in the FireFox Reality Browser.
There are a many reasons to do this, but we’ll just go over a couple here. Then we’ll show you how the process works in FireFox.
- You can change more of the settings. This gives you more control over how you watch your videos. For example in YouTube VR you can select Auto or High quality. But with FireFox, you can see exactly what resolution settings are available. That way you know you are seeing an 8k video in 8k.
- For some reason, certain videos are not allowed to play in the YouTube VR app. Not sure why, but examples are the amazing animated 360 VR 3d videos from Baobab Studios, you can find them here. But they will play in FireFox. You should see these, they really show off VR and 3d well.
Hot Tip! Below is a Step by Step on how to set your resolution to 8k and get the best experience from your 360 Videos. NOTE: This will only work if the video was uploaded in 8k. If you’d like to see a great list we’ve created of our favorites, click here after reading this page.
 Step 1: When you open the FireFox Reality app and go to YouTube.com it will look something like this image. It’s hard to read, but the “gear” icon says 4k where the big red arrow is pointing. Step 1: When you open the FireFox Reality app and go to YouTube.com it will look something like this image. It’s hard to read, but the “gear” icon says 4k where the big red arrow is pointing. |
 Step 2: After you click on that “gear” icon, this will pop up. Now you need to click on the “2160p 4K” and then you’ll see the next image in Step 3. Step 2: After you click on that “gear” icon, this will pop up. Now you need to click on the “2160p 4K” and then you’ll see the next image in Step 3. |
 Step 3: We added the giant red arrows and the giant 4k and 8k so you can see it better. Select the “4320p 8K” and you’re basically done. Where it said 4K in the gear icon at the bottom of this image, it should say 8K. Step 3: We added the giant red arrows and the giant 4k and 8k so you can see it better. Select the “4320p 8K” and you’re basically done. Where it said 4K in the gear icon at the bottom of this image, it should say 8K.
That’s it! Now your videos will now be at the highest resolution you can view them currently. Pro Tip! You’re going to need to do this on every video you watch in FireFox. It resets to 4k automatically on every new video.
Coming up next we show you how to take Playlists from desktop into your headset! This makes it much easier to find the videos you want to see while searching on your desktop and then you can watch them in your headset. |
There’s also no easy way to copy & paste urls from desktop to the headset at this time.
But there is a good workaround. YouTube allows you to make “Playlists” and organize your videos that way. The really good news is that these “Playlists” will sync to anywhere you are logged into YouTube. So your playlists created on desktop or mobile will show up inside the FireFox browser in your headset, if you’re logged into YouTube.com there.
We’re going to show you how to do this below.
How do I get to watch these videos in my headset?
NOTE: We are assuming you’ve already created at least one playlist in your YouTube account. If you haven’t and would like to learn how to do that, Click Here.
We’re going to assume one more thing, that you’ve downloaded the FireFox Reality app into your headset from the Oculus Store. It is free. If you have not done that, please do it before trying to follow these instructions.
The first set of instructions you will see below happen in your headset.
 Step 1: When you open the FireFox Reality app it will look something like this image. You can scroll through these options FireFox has picked for you later, some of them are interesting. But for now, we’re concerned with that Browser entry form at the bottom. You can see the arrow pointing to it. Usually you will see this on the top of most browsers, but it works exactly the same. Step 1: When you open the FireFox Reality app it will look something like this image. You can scroll through these options FireFox has picked for you later, some of them are interesting. But for now, we’re concerned with that Browser entry form at the bottom. You can see the arrow pointing to it. Usually you will see this on the top of most browsers, but it works exactly the same. |
 Step 2: We’re going to point at it and click, a keyboard should pop up and we can enter YouTube.com Step 2: We’re going to point at it and click, a keyboard should pop up and we can enter YouTube.com |
 Step 3: YouTube.com should pull up and look similar to this. Step 3: YouTube.com should pull up and look similar to this. |
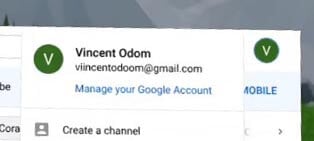 Step 4. This will look familiar if you saw the YouTube VR document. You need to make sure that you are logged into your YouTube account for this to work. If you are not logged in, click on the link to log in and enter your account information. Step 4. This will look familiar if you saw the YouTube VR document. You need to make sure that you are logged into your YouTube account for this to work. If you are not logged in, click on the link to log in and enter your account information. |
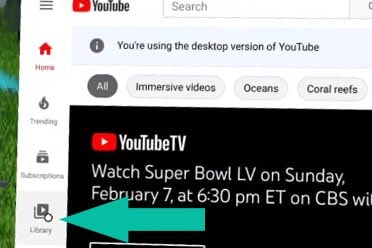 Step 5. Now that you’re logged in, select the Library option you can see here. Step 5. Now that you’re logged in, select the Library option you can see here. |
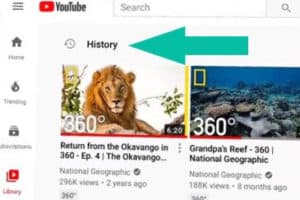
| Step 6. The first thing you will see after selecting the Library will be your History. This will show you a list of your recently watched videos.
|

Step 7. Now you continue to scroll down and you will see your Watch Later videos and finally, your Playlists will start to show up! |
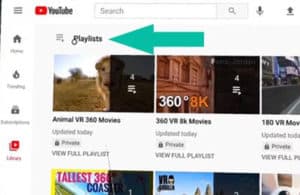 Step 8. There they are, your Playlists. You can select any of them and next the videos will show up that you put in there. Step 8. There they are, your Playlists. You can select any of them and next the videos will show up that you put in there. |